

We have already seen that JDBC DriverManager can be used to get relational database connections. But when it comes to actual programming, we want more than just connections.
Most of the times we are looking for loose coupling for connectivity so that we can switch databases easily, connection pooling for transaction management and distributed systems support. JDBC DataSource is the preferred approach if you are looking for any of these features in your application. JDBC DataSource interface is present in javax.sql package and it only declare two overloaded methods getConnection() andgetConnection(String str1,String str2).
It is the responsibility of different Database vendors to provide different kinds of implementation of DataSource interface. For example MySQL JDBC Driver provides basic implementation of DataSource interface with com.mysql.jdbc.jdbc2.optional.MysqlDataSource class and Oracle database driver implements it with oracle.jdbc.pool.OracleDataSource class.
These implementation classes provide methods through which we can provide database server details with user credentials. Some of the other common features provided by these DataSource implementation classes are;
- Caching of PreparedStatement for faster processing
- Connection timeout settings
- Logging features
- ResultSet maximum size threshold
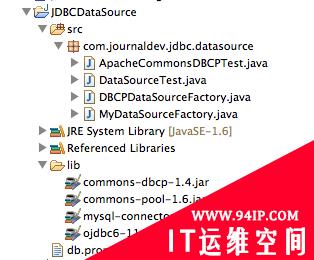
Let’s create a simple JDBC project and learn how to use MySQL and Oracle DataSource basic implementation classes to get the database connection. Our final project will look like below image.
Database Setup
Before we get into our example programs, we need some database setup with table and sample data. Installation of MySQL or Oracle database is out of scope of this tutorial, so I will just go ahead and setup table with sample data.
MySQLSetup.sql

--Create Employee table
CREATE TABLE `Employee` (
  `empId` int(10) unsigned NOT NULL,
  `name` varchar(10) DEFAULT NULL,
  PRIMARY KEY (`empId`)
) ENGINE=InnoDB DEFAULT CHARSET=utf8;

-- insert some sample data
INSERT INTO `Employee` (`empId`, `name`)
VALUES
    (1, 'Pankaj'),
    (2, 'David');

commit;
OracleSetup.sql

CREATE TABLE "EMPLOYEE"
  (
    "EMPID"   NUMBER NOT NULL ENABLE,
    "NAME"    VARCHAR2(10 BYTE) DEFAULT NULL,
    PRIMARY KEY ("EMPID")
  );

Insert into EMPLOYEE (EMPID,NAME) values (10,'Pankaj');
Insert into EMPLOYEE (EMPID,NAME) values (5,'Kumar');
Insert into EMPLOYEE (EMPID,NAME) values (1,'Pankaj');
commit;
Now let’s move on to our java programs. For having database configuration loosely coupled, I will read them from property file.
db.properties

#mysql DB properties
MYSQL_DB_DRIVER_CLASS=com.mysql.jdbc.Driver
MYSQL_DB_URL=jdbc:mysql://localhost:3306/UserDB
MYSQL_DB_USERNAME=pankaj
MYSQL_DB_PASSWORD=pankaj123

#Oracle DB Properties
ORACLE_DB_DRIVER_CLASS=oracle.jdbc.driver.OracleDriver
ORACLE_DB_URL=jdbc:oracle:thin:@localhost:1521:orcl
ORACLE_DB_USERNAME=hr
ORACLE_DB_PASSWORD=oracle
Make sure that above configurations match with your local setup. Also make sure you have MySQL and Oracle DB JDBC jars included in the build path of the project.
JDBC MySQL and Oracle DataSource Example
Let’s write a factory class that we can use to get MySQL or Oracle DataSource.
MyDataSourceFactory.java

package com.journaldev.jdbc.datasource;

import java.io.FileInputStream;
import java.io.IOException;
import java.sql.SQLException;
import java.util.Properties;

import javax.sql.DataSource;

import oracle.jdbc.pool.OracleDataSource;

import com.mysql.jdbc.jdbc2.optional.MysqlDataSource;

public class MyDataSourceFactory {

    public static DataSource getMySQLDataSource() {
        Properties props = new Properties();
        FileInputStream fis = null;
        MysqlDataSource mysqlDS = null;
        try {
            fis = new FileInputStream("db.properties");
            props.load(fis);
            mysqlDS = new MysqlDataSource();
            mysqlDS.setURL(props.getProperty("MYSQL_DB_URL"));
            mysqlDS.setUser(props.getProperty("MYSQL_DB_USERNAME"));
            mysqlDS.setPassword(props.getProperty("MYSQL_DB_PASSWORD"));
        } catch (IOException e) {
            e.printStackTrace();
        }
        return mysqlDS;
    }

    public static DataSource getOracleDataSource(){
        Properties props = new Properties();
        FileInputStream fis = null;
        OracleDataSource oracleDS = null;
        try {
            fis = new FileInputStream("db.properties");
            props.load(fis);
            oracleDS = new OracleDataSource();
            oracleDS.setURL(props.getProperty("ORACLE_DB_URL"));
            oracleDS.setUser(props.getProperty("ORACLE_DB_USERNAME"));
            oracleDS.setPassword(props.getProperty("ORACLE_DB_PASSWORD"));
        } catch (IOException e) {
            e.printStackTrace();
        } catch (SQLException e) {
            e.printStackTrace();
        }
        return oracleDS;
    }

}
Notice that both Oracle and MySQL DataSource implementation classes are very similar, let’s write a simple test program to use these methods and run some test.
DataSourceTest.java

package com.journaldev.jdbc.datasource;

import java.sql.Connection;
import java.sql.ResultSet;
import java.sql.SQLException;
import java.sql.Statement;

import javax.sql.DataSource;

public class DataSourceTest {

    public static void main(String[] args) {

        testDataSource("mysql");
        System.out.println("**********");
        testDataSource("oracle");

    }

    private static void testDataSource(String dbType) {
        DataSource ds = null;
        if("mysql".equals(dbType)){
            ds = MyDataSourceFactory.getMySQLDataSource();
        }else if("oracle".equals(dbType)){
            ds = MyDataSourceFactory.getOracleDataSource();
        }else{
            System.out.println("invalid db type");
            return;
        }

        Connection con = null;
        Statement stmt = null;
        ResultSet rs = null;
        try {
            con = ds.getConnection();
            stmt = con.createStatement();
            rs = stmt.executeQuery("select empid, name from Employee");
            while(rs.next()){
                System.out.println("Employee ID="+rs.getInt("empid")+", Name="+rs.getString("name"));
            }
        } catch (SQLException e) {
            e.printStackTrace();
        }finally{
                try {
                    if(rs != null) rs.close();
                    if(stmt != null) stmt.close();
                    if(con != null) con.close();
                } catch (SQLException e) {
                    e.printStackTrace();
                }
        }
    }

}
Notice that the client class is totally independent of any Database specific classes. This helps us in hiding the underlying implementation details from client program and achieve loose coupling and abstraction benefits.
When we run above test program, we will get below output.
Employee ID=1, Name=Pankaj
Employee ID=2, Name=David
**********
Employee ID=10, Name=Pankaj
Employee ID=5, Name=Kumar
Employee ID=1, Name=Pankaj
Apache Commons DBCP Example
If you look at above DataSource factory class, there are two major issues with it.
- The factory class methods to create the MySQL and Oracle DataSource are tightly coupled with respective driver API. If we want to remove support for Oracle database in future or want to add some other database support, it will require code change.
- Most of the code to get the MySQL and Oracle DataSource is similar, the only different is the implementation class that we are using.
Apache Commons DBCP API helps us in getting rid of these issues by providing DataSource implementation that works as an abstraction layer between our program and different JDBC drivers.
Apache DBCP library depends on Commons Pool library, so make sure they both are in the build path as shown in the image.
Here is the DataSource factory class using BasicDataSource that is the simple implementation of DataSource.
DBCPDataSourceFactory.java

package com.journaldev.jdbc.datasource;

import java.io.FileInputStream;
import java.io.IOException;
import java.util.Properties;

import javax.sql.DataSource;

import org.apache.commons.dbcp.BasicDataSource;

public class DBCPDataSourceFactory {

    public static DataSource getDataSource(String dbType){
        Properties props = new Properties();
        FileInputStream fis = null;
        BasicDataSource ds = new BasicDataSource();

        try {
            fis = new FileInputStream("db.properties");
            props.load(fis);
        }catch(IOException e){
            e.printStackTrace();
            return null;
        }
        if("mysql".equals(dbType)){
            ds.setDriverClassName(props.getProperty("MYSQL_DB_DRIVER_CLASS"));
            ds.setUrl(props.getProperty("MYSQL_DB_URL"));
            ds.setUsername(props.getProperty("MYSQL_DB_USERNAME"));
            ds.setPassword(props.getProperty("MYSQL_DB_PASSWORD"));
        }else if("oracle".equals(dbType)){
            ds.setDriverClassName(props.getProperty("ORACLE_DB_DRIVER_CLASS"));
            ds.setUrl(props.getProperty("ORACLE_DB_URL"));
            ds.setUsername(props.getProperty("ORACLE_DB_USERNAME"));
            ds.setPassword(props.getProperty("ORACLE_DB_PASSWORD"));
        }else{
            return null;
        }

        return ds;
    }
}
As you can see that depending on user input, either MySQL or Oracle datasource is created. If you are supporting only one database in the application then you don’t even need these logic. Just change the properties and you can switch from one database server to another. The key point through which Apache DBCP provide abstraction is setDriverClassName() method.
Here is the client program using above factory method to get different types of connection.
ApacheCommonsDBCPTest.java

package com.journaldev.jdbc.datasource;

import java.sql.Connection;
import java.sql.ResultSet;
import java.sql.SQLException;
import java.sql.Statement;

import javax.sql.DataSource;

public class ApacheCommonsDBCPTest {

    public static void main(String[] args) {
        testDBCPDataSource("mysql");
        System.out.println("**********");
        testDBCPDataSource("oracle");
    }

    private static void testDBCPDataSource(String dbType) {
        DataSource ds = DBCPDataSourceFactory.getDataSource(dbType);

        Connection con = null;
        Statement stmt = null;
        ResultSet rs = null;
        try {
            con = ds.getConnection();
            stmt = con.createStatement();
            rs = stmt.executeQuery("select empid, name from Employee");
            while(rs.next()){
                System.out.println("Employee ID="+rs.getInt("empid")+", Name="+rs.getString("name"));
            }
        } catch (SQLException e) {
            e.printStackTrace();
        }finally{
                try {
                    if(rs != null) rs.close();
                    if(stmt != null) stmt.close();
                    if(con != null) con.close();
                } catch (SQLException e) {
                    e.printStackTrace();
                }
        }
    }

}
When you run above program, the output will be same as earlier program.
If you look at the DataSource and above usage, it can be done with normal DriverManager too. The major benefit of DataSource is when it’s used within a Context and with JNDI.
With simple configurations we can create a Database Connection Pool that is maintained by the Container itself. Most of the servlet containers such as Tomcat and JBoss provide it’s own DataSource implementation and all we need is to configure it through simple XML based configurations and then use JNDI context lookup to get the DataSource and work with it. This helps us by taking care of connection pooling and management from our application side to server side and thus giving us more time to write business logic for the application.
In next tutorial, we will learn how we can configure DataSource in Tomcat Container and use it in Web Application.
你可能喜欢:
-
mysql数据库如何转移到oracle
-
![[DB2, Derby, H2, HSQL, Informix, MS-SQL, MySQL, Oracle, PostgreSQL, Sybase]](https://www.94ip.com/zb_users/theme/ydconcise/include/random/10.jpg)
[DB2, Derby, H2, HSQL, Informix, MS-SQL, MySQL, Oracle, PostgreSQL, Sybase]
-

数据库oracle 目录结构 Oracle数据库入门——sql语句和函数详解
-
Oracle数据导出到MySql
-

oracle与mysql的日期查询区别
-

sql server 2008数据导入Oracle方法
-

MySQL学习笔记—常用sql函数
-
oracle性能检测sql语句
-
JDBC DataSource Example – Oracle, MySQL and Apache DBCP Tutorial
-

在mysql中修改表名的sql语句


发表评论